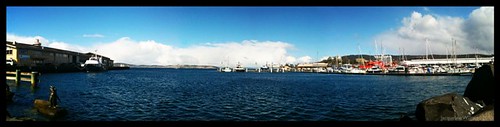
Thursday, September 16, 2010
Using the iphone camera
I was in Hoabart a few days ago and experimented with the iphone camera and flickr app. I just could not resist trying a panoramic. This shot is made up of four low res images and stitched together in photoshop using the photomerge tool. Not bad for a crappy camera. When processing I forgot to sharpen the image because it looked pretty sharp when working on it in PS, however you can really tell the quality now! Still not bad for a mobile phone camera.
Tuesday, March 9, 2010
Tuesday, April 14, 2009
Portraiture


Well, I have spent Easter break taking some shots of my best friends son, Cooper. I wanted to experiment with exposure (yet again since it seems to be my nemesis) and ISO settings. I am beginning to understand the importance of Aperture, Speed and ISO in manual photography, especially in low level light, indoors and you do not want to use a flash.
I hate the flash on the camera; it's harsh and not flattering. The type of portraiture work I like doing is candid shots, where the subject goes about doing what they want to do and I am there taking shots of them. It is better if they are unaware that I am there at all. The flash I have can ruin this aesthetic.
Instead I opted to play around with the ISO settings. I bumped the ISO up to 800. This means that the sensor in my camera is more sensitive to light; therefore it takes less light to expose the image onto the sensor. I also adjusted for a wide aperture - f3.5 - f4. This means that the aperture is open as wide as possible so more light can fall onto the sensor when the shutter is open.
Because I was shooting Cooper indoors in very low light, the camera (under normal circumstances) would want me to set it at a slow shutter speed. This is because it needs more time to expose the images. Because I didn’t want to use a tripod and I needed to twist and turn myself into positions to get the right shot, I bumped up the ISO to 800 and widened the aperture in a hope that the camera would allow me to use faster speeds and expose the image correctly.
I was fortunate that by upping the ISO and opening the aperture, the camera allowed me to have a faster shutter speed, therefore I could hold it and take an image without it blurring from my hand movements. It also exposed the images correctly - or near enough: D
I got some great close up candid shots of mummy and baby breastfeeding and playing. Though just by looking at the pic, what separates mine from a professional shot....one word! Photoshop
I had a bit of a play around with some of the close up pics of Cooper. I used a tip I found in a Photography mag to create these shots - I will try to explain the best way I can, since I don’t have the mag with me.
I went into the Image menu - adjust - Channels and kept the RGB Red at 100%, Blue 0% and Green at 0% and ticked the boxes for monochrome. This changes the picture to a warm black and white.
I right clicked on the layer and selected the copy background option. This makes a new layer.
Make sure the new layer is selected and then use the pen tool, wand or selection tool to select an area. For my images I selected the background area and left the face of Cooper un selected.
On the layers palette select masks option - it’s a button at the bottom of the layer window.
In the filters menu choose Blur - Gaussian blur and set it at around 15px. This had in my image blurred the background that I selected. It gives a soft, blur feel.
I then choose the image menu - Adjust-curves and I mess around with the highlights and mid tones to add a glow type of effect to the images.
Tuesday, March 31, 2009
Monday, March 30, 2009
Pictures I took at the AP meet last Sunday. I only took around 50 pics - which is strange for me as I usually take around 200 per shoot. What I did take, I didn't like - so in an effort to post something up to the AP forum, I cropped some pics, experimented with PS and the above pics are the results.
My biggest problem on the day was the over exposures of the sky - just couldn't get it right.
Friday, March 27, 2009
Panorama
I received some advise about cropping one of the landscape shots I took from the car around Liffey way. The main reason to crop was getting rid of the blown highlight of the sun and clouds in the top right of the image. The aim is to create a panoramic scene.
I have to say I don't mind the result.
I have to say I don't mind the result.

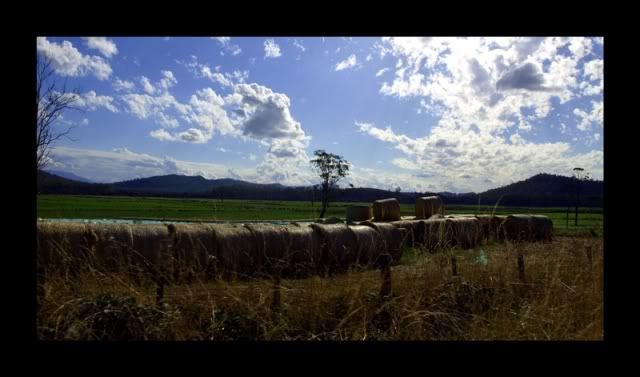
Thursday, March 26, 2009
Shutter Speed
My family and I spent half of Sunday at Liffey Falls. I though this was a great opportunity to experiment with shutter speed. So here I was taking the bush hike down and up, passing by tourists with my camera and tripod.
I managed to take a few posed pictures and thought at the time I had got some great shots. After processing them, I'm not too sure I like them. Again a bad case of over exposed areas :(
The below pics is the first attempt at seriously processing the images from Liffey through PhotoShop CS. I mainly fiddled around with saturation and levels. I also stepped my way through a tutorial on adding black boarders - which I think would make any pic look great.
I am still no closer to my goal of creating the perfect focused and exposed picture...
Subscribe to:
Posts (Atom)